
Advanced Image with Focal Point in Sitecore 10.1

In this blog, I am sharing details on an approach used for Image cropping based on focal points. Even though, there are lots of blogs talking about how to use it, but none of them shared the technical details about how it actually works, what is the idea behind building the functionality and what each configuration, code or item in Sitecore does. So I decided to share these details with the community.

The Problem 

In Sitecore, content authors are responsible for creating, managing, and publishing digital content across websites and digital platforms. They are also responsible for managing the images in Sitecore media library. Managing image resolutions for different devices involves creating and serving images that look sharp and load efficiently across various screen sizes and resolutions requires images to be uploaded in different resolutions cropped such that the focal point is always in center. 

Content authors wanted the ability to upload a single image in an agreed up (lets say 16x9) aspect ratio in the highest quality recommendation and then be able to select a focal point that would then crop the image to a size and aspect ratio that maintains the focal point as the center of the cropped image. 

The Research

We are aware about lot of options which can provide similar ability. Some of these are listed below -

  1. jQuery Focuspoint
  2. Cropping Images by CSS
  3. Advanced Image Sitecore by Saad and later updated by Amit
  4. Advanced Image by Kate
  5. Image Focal Point by Anindita
Option 1 & 2 provide ability to crop images based on focal point on client-side only. Problem with this even when images are being cropped, the image is still being sent in high resolution with large size to browsers. This can lead to low core web vital score.

Option 3 & 4 are very similar and seem to be inspired from a common source. They are good options but had few challenges - 
  • The Sitecore module referred in these articles was not present in Sitecore Marketplace anymore. Fortunately, Kate Orlova has added the package of Sitecore items to her git repo which saves you from misery.
  • They shared steps on how to get modules to work but do not share how the functionality actually work behind the scenes. As such, you will keep reading the code and hitting debug points to understand the module.
Option 5 only lets you select focal point on an image and then store it in Image item's description field. It leaves the question open ended on how to actually crop the images

To us, option 3 or option 4 made more sense as we wanted to crop images on server to avoid sending big images to client side. 

The Solution

Cropping images based on focal point can be considered as a 2 part problem - 
  1. Finding a focal point in an image item
  2. Cropping image by keeping focal point at the center
Both of these are discussed with code snippets in following sections.

Finding a focal point in an image item

This is achievable by integrating focus-point module in Sitecore client (Read more about this module here). The module js/css are included in below files in the project -


Next, we need to create a new custom field called as AdvancedImage (based on Image field) which will have logic to integrate focus-point module into it. This is done in below item in Core DB -


Content authors also need to have a way of configuring different resolutions in Sitecore so that the AdvancedImage field can use these resolutions to show a preview of the image. This will help content authors to choose the focal point for an image efficiently while previewing it in different resolutions. This is done in below item in Master DB -


The AdvancedImage field shall have a logic to introduce some custom html into the field. This custom html will be responsible for providing a preview of the cropped images with focal point. The project has template.html file for this purpose -


The above HTML is rendered in Sitecore using AdvancedImage.cs DoRender() method as in snapshot below-


Once the focal point is selected for an image item, the focal point coordinates shall be stored into image xml so that they can be referenced when the image is added to a page. If you check the raw value of AdvancedImage field after selecting a focal point, it shall look like this- 
The cropX and cropY values in AdvancedImage field's raw value need to be copied to image request's query parameters. This is done in HTMLExtensions.cs file as in snapshot below. These values are latest used by CropMediaRequest.cs to copy them from query parameters to Media Custom Options and finally by Crop Processor for croppping logic - 


Cropping image by keeping focal point at the center

    • This can be done by using a library like ImageProcessor or ImageSharp. Developer needs to provide the height, width and (x,y) points for focal points to the library. The library can then resize the image by keeping the focal point at the center and return the cropped image. This is done in CropProcessor.cs file -
Next, we need to know when and where we can hook this processor in Sitecore. An ideal candidate for it is <getMediaStream> pipeline which is responsible for creating an output stream of media item being requested. Logic to resize image with focal point can be hooked into this pipeline logics easily. This is managed in below config -


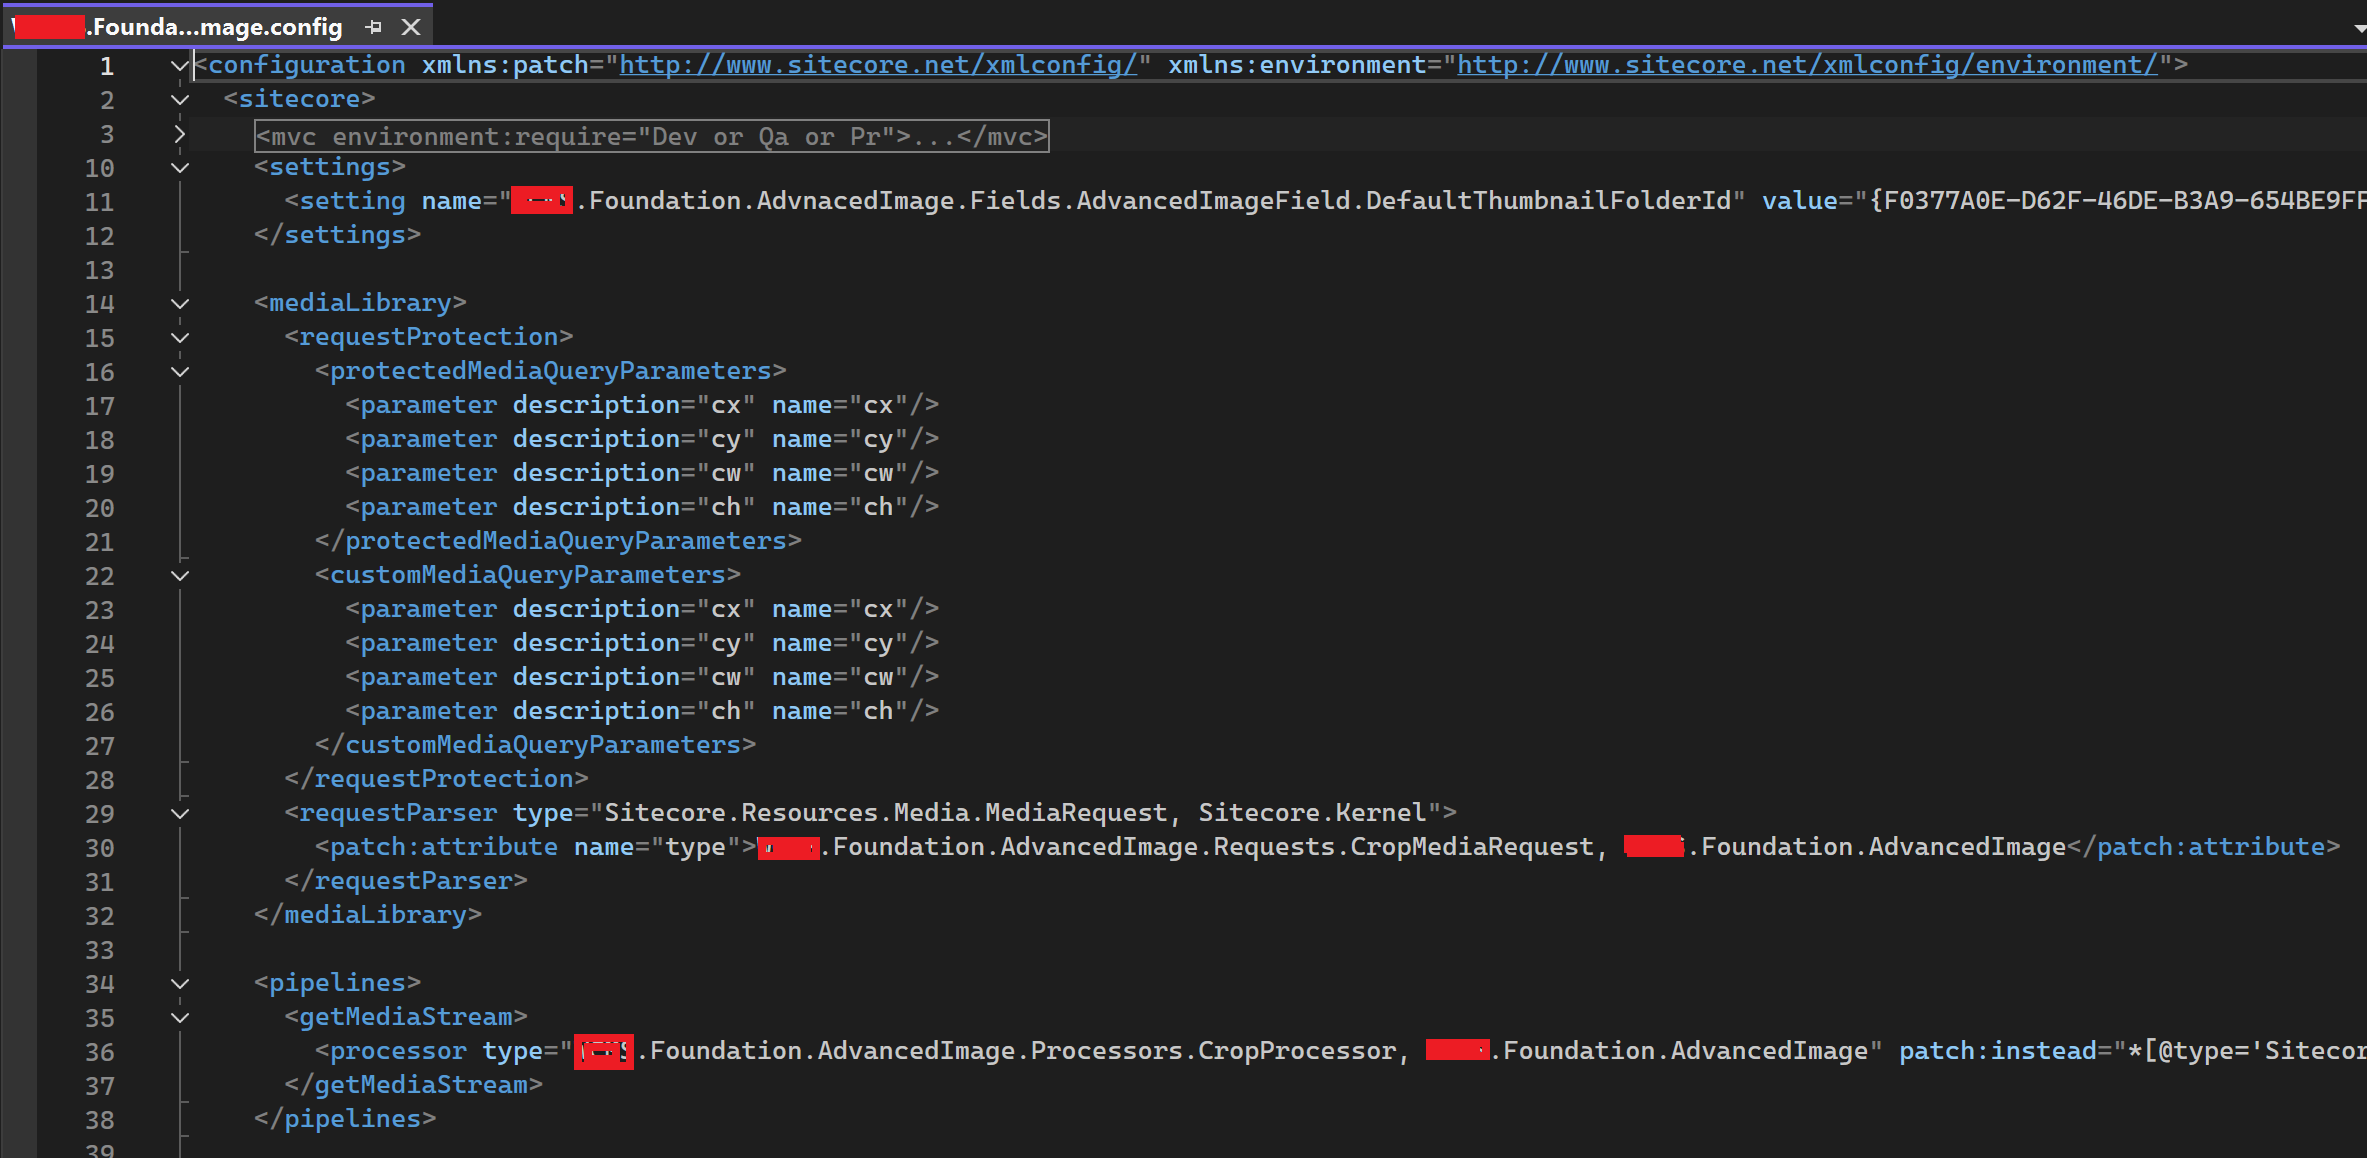
There should be a way to store the height, width, x, y values in Sitecore and then pass them to the getMediaStream pipeline. This is done by adding custom request parameters to MediaOptions which contains options for media items (this is done in above config).
    • These custom options to MediaOptions can be added when the media request is received by Sitecore. 


Hope it helped you guys! Thanks for reading!

Comments

POPULAR POSTS

Sitecore PowerShell Script to create all language versions for an item from en version

  We have lots of media items and our business wants to copy the data from en version of media item to all other language versions defined in System/Languages. This ensures that media is available in all the languages. So, we created the below powershell script to achieve the same -  #Get all language versions defined in System/Languages $languages = Get-ChildItem /sitecore/System/Languages -recurse | Select $_.name | Where-Object {$_.name -ne "en"} | Select Name #Ensuring correct items are updated by comparing the template ID  $items = Get-ChildItem -Path "/sitecore/media library/MyProjects" -Recurse | Where-Object {'<media item template id>' -contains $_.TemplateID} #Bulk update context to improve performance New-UsingBlock (New-Object Sitecore.Data.BulkUpdateContext) { foreach($item in $items){    foreach($language in $languages){ $languageVersion = Get-Item -Path $item.Paths.Path -Language $language.Name #Check if language versi

Export Sitecore media library files to zip using SPE

If you ever require to export Sitecore media files to zip (may be to optimize them), SPE (Sitecore Powershell Extension) has probably the easiest way to do this for you. It's as easy as the below 3 steps -  1. Right click on your folder (icons folder in snap)>Click on Scripts> Click on Download 2. SPE will start zipping all the media files placed within this folder. 3. Once zipping is done, you will see the Download option in the next screen. Click Download Zip containing the media files within is available on your local machine. You can play around with the images now. Hope this helps!! Like and Share ;)

Make Sitecore instance faster using Roslyn Compiler

When we install the Sitecore instance on local, the first load is slow. After each code deploy also, it takes a while for the Sitecore instance to load and experience editor to come up. For us, the load time for Sitecore instance on local machines was around 4 minutes. We started looking for ways to minimize it and found that if we update our Web.config to use Roslyn compiler and include the relevant Nugets into the project, our load times will improve. We followed the simple steps - Go to the Project you wish to add the NuGet package and right click the project and click 'Manage NuGet Packages'. Make sure your 'Package Source' is set to nuget.org and go to the 'Browse' Tab and search Microsoft.CodeDom.Providers.DotNetCompilerPlatform. Install whichever version you desire, make sure you note which version you installed. You can learn more about it  here . After installation, deploy your project, make sure the Microsoft.CodeDom.Providers.DotNetCompilerPlatform.d

Experience of a first time Sitecore MVP

The Journey I have been working in Sitecore for almost 10 years now. When I was a beginner in Sitecore, I was highly impressed by the incredible community support. In fact, my initial Sitecore learning path was entirely based on community written blogs on Sitecore. During a discussion with my then technology lead Neeraj Gulia , he proposed the idea that I should start giving back to developer community whenever I get chance. Just like I have been helped by many developers via online blogs, stackoverflow etc., I should also try to help others. Fast forward a few years and I met  Nehemiah Jeyakumar  (now an MVP). He had a big archive of his technical notes in the form Sitecore blogs. I realized my first blog dont have to be perfect and it can be as simple as notes to a specific problem for reference in future. That's when I probably created my first blog post on Sitecore. At that time, I didn't knew about the Sitecore MVP program. Over the years, I gained more confidence to write

Clean Coding Principles in CSharp

A code shall be easy to read and understand. In this post, I am outlining basic principles  about clean coding after researching through expert recommended books, trainings and based on my experience. A common example to start with is a variable declaration like - int i  The above statement did not clarify the purpose of variable i. However,  the same variable can be declared as -  int pageNumber The moment we declared the variable as int pageNumber, our brain realized that the variable is going to store the value for number of pages. We have set the context in our brain now and it is ready to understand what the code is going to do next with these page numbers. This is one of the basic advantages of clean coding. Reasons for clean coding -  • Reading clean code is easier - Every code is revisited after certain amount of time either by the same or different developer who created it. In both the cases, if the code is unclean, its difficult to understand and update it. • To avoid s